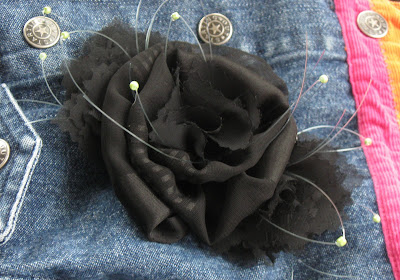
I've mentioned before that I make the flair for our MOPS group's Thank-You baskets that we give to our guest speakers. As an end-of-year thank-you, we're also giving these baskets to our Moppets workers (those angels who watch our drooly children). We have 4, and I need to make 3 baskets (the other one's a guy, and we give him a gift card). One of the 3 ladies is a teenager who is gorgeous, has very dark hair, wears a lot of dark colors and chunky boots and such. She's the sweetest thing, and a little goth. I wanted to make her something that would go with her punky style, but something that's pretty at the same time. So, going off the flowers that I made in practice for my friend's veil, I made this black one with tiny green beads on plastic wires, whisping around the outside. Pretty, but edgy in black with raw edges here and there. I LOVE it! But I couldn't get a good picture of it to save my life!

Anyway, here's how I made it:

I started with a length of fabric. This was left over from another project. It's not long; probably about 12 - 16 inches. It gets wider toward one end. That part's optional.
 Fold it in half lengthwise, tuck in the short ends, and run a gathering stitch down the long raw edge.
 My machine gathered mine for me. Not sure what that was all about, as it was at its regular setting. If your machine doesn't do that, loosen your tension and lengthen your stitch as much as possible and pull your bobbin thread to gather it.
You'll need a long rectangle for the back, to attach the flowers to, and a bunch of squares for the middle of your center flower and for the outside flowers. I can't remember exactly how many I used. Probably about a dozen for each end flower, and 5 for the middle of the center flower. They don't have to be perfect, or the same size.

Run a circle of hot glue in the middle of your backing and attach your center flower piece to it in a spiral shape. Glue all the edges down well.
 For the whispies (what else would you call them??), I used fishing line that I found in a box (what was THAT doing in my craft room???) and some tiny green beads from an ill-fated barefoot sandal project sometime last year. Cut about 6 inches of fishing line, pinch it in the center, and pass a flame near the tip of the loop. It will cause it to crease. Thread a bead on the line, dab a TINY drop of hot glue on the crease, and immediately slide your bead over the glue.
For all the pieces with a raw edge, I used this method:
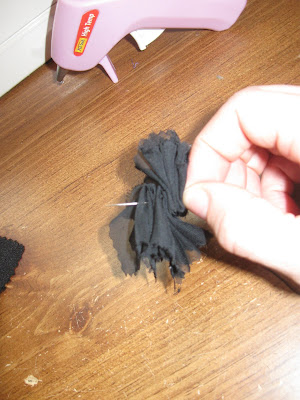
Take a square. Fold it in half. Fold in it half again. You now a have 4-layered square. Run a needle through the folded corner. Repeat with as many pieces as you need to achieve your desired fluffiness.

Run a few stitches in and out of the folded corner to keep it stable.

Tie it off and trim your thread.

Dab a ball of hot glue in the middle of your center flower. Layer the following:
1. Whispies, centering the middle in the glue ball.
2. One unfolded square, centering the middle onto the glue ball.
 3. More glue.
4. Your folded, stitched squares (the little flower you just made).

You now have your completed center flower! Take about a dozen squares and repeat the folding and stitcking it on a needle parts.

Once all your squares are on your needle, fan them out. This will give the width you need. Stitch them all together so that they don't move.
Make 6 more of these.
 Put a few squeezes of glue on the corner of your side flower. Lay 3 whispies across it, at the middle of the whispie.
  Lift up the side of your center flower and tuck your side flower, glued end first, under it. Put all the glue you need between the center flower and side flower to stick it well.
 Glue the side flower to the backing. Make sure it sticks well.
This is what you'll have:

Repeat for the other side.
Trim up the backing once your side flowers are in place.

Hot glue a pin on each end on the back. This is pretty wide, so it needs two.

And you're done! It really is lovely in person. I'm absolutely tickled with how it turned out. And I hope I'm not the only one!
Part 2 of This AM in the Craft Room will have to come later. I just received word that I might be let out of the house for an hour or two tonight sans Little Miss and Gusto, and I have a lot to do before I go!


6 comments:
This is fantastic!!!
I have made these flowers before, I totally love your take!!!!
=)
This is great! I would love it if you would link up to Flower Week @ Singing Three Little Birds
Thanks, Cassie!
Absolutely, Julie! Will do!
A quiet little aDORable!
thanks for tutorial
I follow you
mari from italy
Thank you, Mari!
Post a Comment