Tuesday, December 22, 2009

The Biggest One

Now that it's already been opened, I can tell you about the most time-consuming Christmas gift I put together this year. And probably the most impressive, because of all the work that went into it. It wasn't hard, but there was a lot to it. And it's BIG! At 12 feet long, this baby holds 14 fabric shapes with photos.


Here's what I did:
I picked out a couple of large scraps of Christmas-colored material and found the rest of the fleece throw that I used for Rhyl's Tinkerbell costume for the backing. Not one to waste "pricey" fusible interfacing, I used spray glue to adhere the fabrics together, chalked a triangle, square, or circle onto the back, cut it out, stitched it together, and trimmed around the edges with pinking shears. (Here is where I SHOULD HAVE added the photos, because it was a pain having to maneuver around the tape once they were all one.) I did not think this thru, so I attached the shapes to the tape instead. I then sewed on buttons to the tape over the tips of the "trees" and ribbons and charms to the "wreaths", just for fun.


Next, I cut out photos to fit into the shapes and anchored them with glue. Elmer's is fine. I think mine is Tacky (there's a joke in there somewhere). This isn't altogether necessary, but I didn't want to fool with pins or tape. Quick and easy was my motto for this project.


Finally, I cut strips of the fabric scraps with my pinking shears to make ribbons to frame each photo. I used a zig-zag stitch around the edges, turning the ribbon over at each corner, and trimming the corners off so that they wouldn't stick out. I topped it off with a ring on each end for hanging, carefully folded it around a piece of cardboard, wrapped it up, and sent it off to my dear sister in South Carolina.


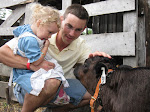
Why was this project necessary, you ask? The reason I took on something special at the last minute is entirely sentimental: my oldest sister is a traveling nurse and isn't able to make it home for Christmas due to her schedule. She's in SC, we're in Mo (Ia, technically, for me). This is the first Christmas I can remember that she won't be around. She doesn't have a Christmas tree or decorations in her apt. No Christmas? No family? No way! This is meant to be a nice reminder of those of us back home who love and miss her, as well as a way to bring a little holiday cheer into her temporary home that her cat cannot destroy. :) We love you, Bethie!


Here's what I used:


*3 yards of double fold bias tape (could have made my own, but didn't have the time) in dark green


*Fabric scraps (1/2 yd or less is more than enough) for shapes in 2-4 colors


*Fabric for backing (1/2 - 3/4 yd is plenty)


*Spray glue (could have used pins, but that would have required more attn, and I was lazy and in a hurry)


*Thread (I used contrasting bright red thread)


*Photos


*Buttons, charms, ribbons, etc, for decorations

*White glue

I cannot stress enough that there is no "right" way to do this, and probably many, many better ways than I did.

Maddy the Pioneer Girl

Who would have thought there would be such a need for pioneer/settler outfits??
The most recent was for my cousin Maddy's school program.
She was Sybil Ludington, a sort of female Paul Revere.
Here she is! How pretty!
Maddy would have made an adorable pioneer. I mean, 300 years ago.
Obviously, she makes an adorable pioneer now, as well. Thanks, Maddy!

My Most Recent Shop Addition

Remember scrapbuster month on http://www.sewmamasew.com/ ? This is my version of the scrappy needle keeper . I made it a while ago, but I didn't put it in my Etsy shop until last night.

Not sure why. I guess, there came along about 7 people I thought I'd give it to, but it wasn't quite right for them in some way or another.
I love it, but it isn't quite my personality. I mean, it's not NOT my personality, but it's not a perfect fit (as my other needlebook definitely IS).
But it's pretty, and lovely, and nice, and unique, and somebody's gonna love it!

Monday, December 21, 2009

And More I-Spy Bags

I have two left over from my Christmas stash. My kids already have plenty of gifts, but they'll get these if no one else wants to buy them. At least that will save them from a year of storage in my sewing room closet.


(They are Christmas themed, perfect for any kid, and only $7 a piece if you're interested.
Plus actual shipping costs, if I have to mail it to you.)

Another Ribbon Necklace

I am in love with these necklaces! They illustrate the beauty there is in simplicity, which is just about my favorite design guideline. Sure, I love ruffles and crazy seams and patterns just as much as the next girl (well, maybe not JUST as much, but still quite a lot), but there's something refreshing in simplicity.

Ribbons and beads. That's all!
Unless you count the thread--and if you must count the thread, you're just being tedious--or add a clasp, which I did for this one. I like them tied behind my neck in a little bow, but this one isn't for me so I decided to be a bit more professional.
Because it's a gift, I won't tell you just how much it cost, but at 29 cents/yd for the ribbon and a few bucks for the beads, lets just say, it's one of my most impressive "It's the Thought that Counts" gifts. These are the gifts that it's REALLY hard not to keep!

Thursday, December 17, 2009

Early, Early Morning

I have been up since 4am. Gus hasn't been sleeping very well at night, and that was the last time I put him back to bed. Downside: I'm going to be REALLY tired by this afternoon, and the kids' naps are usually staggered. Upside: My day is terribly organized now, and I'm ready to go! And I've already gotten quite a bit done! (Some of which I cannot divulge, as it is Christmas-related and I'd like it to be a surprise to the recipient, who I'm sure keeps up with the blog. Sorry!)

Here's what my day looks like:

And here are a few other things...

I've made dozens of dozens of cookies (does that make sense?) in the last few weeks, because we're still looking to have some $$ left in savings after the holidays are over and it's slightly cheaper than buying everybody gifts. Not to mention, some loved ones (ah-hem, Mother) are getting downright rude about not wanting any gifts this year. I take that to mean they don't want impractical gadgets which they'll never use cluttering up their closets for the next decade, so I went the Framed Photo and Food route. I had it on the mental back burner to come up with an inexpensive yet aesthetically pleasing way of packaging the confectionery goodness (who wants extra cookie tins lying around, and they're at least $1/ea, which adds up!) when this idea fell into my lap! How perfect! And practical, cute, cheap, quick... Found on OnePrettyThing, of course, hers are much better than mine, but she's got lots of fun tools that I don't have. I have craft scissors, a hole punch, holiday ribbon (the plasticky kind), a Sharpie, and some construction paper. That's all I'm working with here, so I think they're pretty good. And when the kiddies are old enough, which won't be long from now because these are so easy, they can take over this part of the holidays.

A few other things I forgot to mention over the last week or so:

I was fretting over the amount of $$ I was going to have to pour into a new coat. I'm in love with the knee-length, button-front wool coats that are all the rage right now. The cheapest sale price I could find near me was over $50, which I hate to pay for any one thing, but I needed something that wasn't a red Columbia coat, a black leather coat, or a denim jacket. You know, something church-worthy but not formal. Then I got to thinking... Don't I have a wool coat? Why, yes I do! Two, in fact, but they were both full length. One is a true vintage swing-type coat that belonged to my late grandmother, and there's just no way I'm going to hack into that. I purchased the other, this beauty, at a thrift store for $15 in 2003. It saw me thru most of college and has been haunting my closets ever since. It's really nice, but a little too formal for most places. So I cut and hemmed it, and voila! I'm so happy, I could just wear it around the house. And I did, for a little while. "New", stylish, lovely wool coat, for all intents and purposes, FREE!


Next: my battery bag. I realize this isn't particularly attractive, but that's not really what I was focused on when I put it together. I must confess something: I am guilty of throwing dead batteries in the trash, and that's just what I feel every time I do it: guilty. The chemicals in those things are just awful, but where the heck would I put a load of dead batteries while I worked up a supply big enough to warrant a special trip to the recycling center (yes, I do recycle, but the place I usually go doesn't take batteries, so it would be a special trip). My recycling system is a work in progress--right now it's just some lone paper sacks sitting in the closet behind my trash can--and this is a major step in the right direction. Hanging on a thumbtack above my trash can is this tiny reusable fused plastic storage bag for used batteries. This is the coolest idea! Iron your plastic grocery sacks in sheets of plastic, and you can sew in together. It's a tiny bit tricky, but once you figure out which setting your iron works best on, it's a breeze. Entirely practical, environmentally-friendly, and the possibilities are endless.


Here's a gift bag I made out of fused plastic. Nick said, "seems like a lot of work for such a little outcome". But not really. The hardest part was figuring out which setting the iron should be on. The rest was a cinch. And for free material, I'll continue "working".


The kids are up, so I have to get going. One more thing: I love it when I hear from friends that they read my blog, or see something on it. It really feels like I'm not talking to myself. So if you do see something you like, just remember that it gives me a warm, fuzzy feeling when you let me know that I'm not all alone here. :)

Happy Thursday! Hopefully yours will be shorter than mine. :)

Monday, December 14, 2009

Cowgirls Don't Cry: Simplicity 3680

I could NOT be happier with my most recent pattern project! A MOPS friend asked me to make a cowgirl outfit for her niece's Christmas present, and when I got to looking thru patterns for ideas I came across the most adorable, practical pattern I could ever have imagined for little girls!
Their examples are a witch, a disco girl, a pirate, a cowgirl, and a fairy, but I think you could make this pattern into anything just by changing the motif of the fabric. I love it! And it's SO easy! This just might be the quickest, easiest pattern I've ever used.
The belt is not attached to the dress. The brown skirt is. I left the fringe off because I pride myself on turning out a quality product for LESS than an arm and leg, and fringe is expensive!! So I cut some into the faux suede upper skirt with pinking shears.
I'm not even going to wait for the compliments! Cute, Cute, Cute! Rhyl has asked for the Tinkerbell version. Not sure when, but she will have it!

A Productive Morning!

With my morning coffee, I also take in a good dose of http://www.oneprettything.com/ and usually some creative blogs to go along with it. Really gets the blood (and ideas) pumping! This morning I found http://www.samstermommy.blogspot.com/ where a fellow crafty mom (who takes MUCH better pics than I) has put up her thought and goings-on for all to enjoy. The reason I was there: this necklace and this necklace. These tutorials only fueled the project I had in mind when I saw an ADORABLE very similar necklace at Peebles.* I still plan to make a few more--I REALLY REALLY love the black ribbon and black beads, but it'll take more than my sewing stash to produce that (but hopefully no more than a trip to the Salvation Army, or maybe Ben Franklin's). Here, out of my coffee can of old/broken jewelry and my bag o' ribbons salvaged from gifts/worn out clothing/other packages/etc: my "new" necklace. I have no idea where the ribbon came from--if I had to guess, I'd say it adorned a baby gift--and the beads were the handles of a gift bag. Cost: a few inches of real estate in my sewing room for a few years. Now, on to produce an outfit to wear it with!


Also a product of my morning: place mats for Rhyl. She has taken to eating with a napkin or wash cloth under her dish, and she's wild about princesses, so I decided to combine with two. She got to pick out the fabric (hate to admit--at WalMart), which was fun because she's always looking over the little kids' fabric while I'm perusing the other stuff, and this time she got to have some! Princesses and crowns + three bleached-out, stained-up dish towels that were headed for the rag bin = 6 quilted place mats the perfect size for a 2 y/o. These really have made it easier for me to get her to sit down and eat. For the first few days, anyway. We'll have to see how long that lasts! I realized too late that I should have used a brighter contrasting bobbin thread (for the back), but I'll just have to keep that in mind for next time. I'm sure I'll be putting together Spiderman or Thomas the Tank Engine mats for Gus in the next year or so. (Funny--I use place mats for other projects, but make place mats when I need some for their original use. Did anybody else catch that?? lol) Cost: $2.50 for fabric at WM.


*Conversation with Peebles Guy at check-out counter regarding necklace:
Me: Oh, I just love that!
PG: Would you like to try it on?
Me: No, that's okay. I shouldn't even be here in the first place, and I don't need a necklace.
PG: Sounds like a shop-a-holic to me!

Me: No, no, nothing like that. Just some Christmas shopping. But it's so pretty!
PG: I was just kidding. Are you sure you don't want it?
Me: Yes, I'm sure. (pause) How much is it?
PG: $16.
Me: Hey, that's actually not bad.
PG: You can get it!
Me: No, see, I make things, and I just can't pay $16 for something I can make with a ribbon and a few beads.
PG: Aw, but you don't want to make it--you want to buy it!
Me: No, I want to make it. Thanks anyway. It is very pretty. (As if a compliment on the necklace would make him feel better about my not buying it.) Oh, I gave you the wrong card!! .....

Wednesday, December 9, 2009

I Spy Christmas!

I love these little toys. The hardest part about this project was finding the vinyl for the window. In my little corner of the Midwest, there doesn't seem to be a craft store that carries it within an hour of me, so I bought some pencil bags, deconstructed them (kept the zippers, of course!), and used the windows for this project. The big ones, imo, are a little too big, but this was all sorts of learning for me, so all in all it was a real success. Whichever ones I don't sell (a friend wants 2 for her kids) will be gifts from Santa for the babes.

Monday, December 7, 2009

Cop Costume

Finally got a picture! Silly me, forgot to take one after I made it. :P

My friend Nicole's husband is a police officer with our esteemed county Sheriff's Dept, and their 3 year old wanted to be a cop for Halloween. I cut a full-sized adult uniform (shirt and trousers)down to a 3T. At the time, I had never made a shirt with a proper collar OR pants of any kind. This project convinced me that I can conquer the world with just a needle and a thread, because it turned out pretty well!


I free-handed the pants, but for the shirt I bought a button-down collared shirt from the Salvation Army for $1 and cut it at the seams to make a pattern. I removed the badges and pockets, cut the seams on the big shirt, cut the pieces out of it, and sewed it all together. Voila!