Monday, July 27, 2009

Rhyl the Settler!


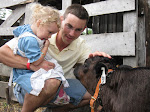
I LOVE Renaissaince Faires, but I haven't found any close enough to get involved with. The next best thing is the Thresher's Reunions that abound in our little corner of Iowa! (That would be the southeast corner, fyi!) Or perhaps I just like dressing up. That may be it... Anyhow, I am one sunbonnet away from being done with my toddler's pioneer girl outfit that she will wear to the Threshers fairs, where revellers celebrate life in the midwest before the Industrial Revolution. To see more, you can go to http://www.oldthreshers.org/. It's fantastic!

No smiling or looking at the camera for this girl today; Sesame Street was on. And she wouldn't put down whatever movie it was that I bribed her with to try on her dress. It's been tough going, getting her to try it on. She'll have to learn to love it, I suppose!

Oh, BTW--the dress is a pillowcase! Cut off the top few inches at the folded end, cut out arm holes, make elastic casings for the collar, use the piece you've cut off for sleeves (tubes that are gathered at the end w/elastic), sew it all together, add some lace, and voila! A dress. Also, there's a simple petticoat underneath it all. VERY easy! I put the whole things together in a few hours last night and this morning.


Essentially, this outfit cost me less than $1 in material, because the pillowcase was a Salvation Army find and the rest of the material is recycled or gifted.

Sunday, July 26, 2009

A Preview


Something that I'm finally finished with, and quite proud of! Go to http://www.mrsdesigns.blogspot.com/ to see more!

Saturday, July 25, 2009

Product Reviews

I spend a lot of mental time wondering if products really work, and agonizing over spending the money to find out. Occasionally, I'm going to throw out some [unsolicited] feedback about things I've tried. Do they work? Don't they? Do they have fulfill purposes other than the intended? All interesting stuff. BTW, if you have a different experience than I do, please talk about it here! I'm not trying to knock something just because it doesn't work for me--it still might be a magic key to someone else's happiness!


7-25-09

My skin has been terrible since I was a teenager, but having babies has made it unmanageable, to say the least. I was using a Mary Kay cleanser that worked, but my skin seems to have finally outsmarted it, per usual. But we had a good run--even better than ProActive, which is about the only other thing I found to work on my acne. Now I'm on to St. Ives Swiss Formula Apricot Scrub (Blemish & Blackhead Control). It works! And, since it's so scrubby, it leaves my skin very soft. I have broken out a few times while using it, but not as bad as what my breakouts normally are. I'd recommend it! And that's saying a lot of a skin care product, because they so seldom work for me.

7-25-09

The baby hormones continue to wreak havoc on my hair--all of it! The hair on my head is catching up with all the shedding that it missed out on when I was preggers, so it's falling out in brush-fulls. But perhaps worst of all my hair-nonsense at the moment is my body hair. It is growing at an alarming rate! Shaving every day is irritating, and the hair grows so quickly that I decided to look into something else. I dropped the $4 or so on Veet Rapid Action Hair Removal Lotion (for Normal Skin with Softening Oils). My first complaint is that I have a hard time removing it from my skin. Most of the hair is removed when I finally do get it all rinsed away, but the stubble the next day is unbelievable! Also, it's supposed to work in three minutes--more like 6. And don't dare get it on a scab or a cut! Common sense will tell you that it will burn, and so will I. For hours! O!U!C!H!

So much for this product being better than shaving. For me, it's not. I need something that makes the smoothness last longer than 16 hours, so I'll keep looking. Any suggestions are, of course, requested and enthusiastically welcomed.

Wednesday, July 22, 2009

Re-usable Bread Bags (Shopping bags)

I can't remember where I saw this idea first, but it's around. They are tote bags that, instead of being squarish as usual, are long and thin, making them perfect for a loaf of bread, a bottle of wine, a carton of eggs, or anything else that needs a bag of its own. They are made of the bottom couple feet of demin jeans legs, and I've lined them all with tapestry which makes them thick and heavy. Very simple, very stable, very (fun)ctional. Embellish how you please. I've put the pockets from the jeans on a few of them.

They're one of the easiest sewing projects ever, too! Here's what I did:
1. Cut pant leg off 2 feet or so from the bottom. Attach any appliques or embellishments. Finish bottom hem and square off corners, if desired (that gives it a flat bottom).
2. Cut lining. Sew side seem. Cut and finish strap (belts work well for this, too).
3. There are a few ways to attach the lining and straps.
a. If you want the lining below the top of the outside piece (i.e. the hem of the pant leg) so that you can turn the top of the finished bag down and see denim, I think this is the easiest way:
Finish the bottom edge of the lining. Turn the top half inch or so over on the top edge of the lining toward the wrong side of the fabric and hem it. Position it where you want to attach it onto the inside of the bag, with the wrong side of the lining facing the wrong side of the outside piece. If you want a cleaner look on the straps, tuck the ends between the lining and the outside piece (be sure to position the strap's ends correctly so that they're where you want them to be, and be careful not to twist the strap, unless that's the look you're going for). Pin everything in place and sew it all together. Then you're done!
b. If you want to attach the lining so that it will show on the finished bag when you fold the top over, turn your lining with the unfished bottom inside out. Put their right sides together with the tops matching. Sew the tops together. Turn the whole thing right-side-out thru the bottom hole (the unfinished bottom) of the lining. Finally, finish your lining and attach your straps at the desired position on the inside of the bag. (I think I got that right--that step always confused me, so if I got it backwards, please let me know! lol)
c. If you don't want to turn the top of your bag down, you don't have to. Attach the lining using Step b, but place the strap ends between the lining and the outside piece, making sure the body of the strap is between the lining and the outside piece as you're sewing. It's a good idea to pin it to the outside of the bag to keep it out of the way (otherwise you might end up with it sewn into the hem--listen close, this is experience talking).

There's no wrong way to do it, as long as you like your finished product. Now, let's go shopping!

PS--A quick idea. You know those plastic containers shaped like a loaf of bread that you can store your bread in? Sticking one into the bag will ensure that your precious goods don't get squashed on the way home! I mean, you're out of bread anyway, right? Might as well take it with you in the bag. :)

Pour Spout Canisters

I'd be fibbing if I took the credit for this clever little idea. I'm not entirely sure where it came from. All I know for sure is that when I was in second grade, we had to invent something as a project for school. My dad "helped" me. He said that his grandma used to do make these. 18 years later, when I needed something for my baking soda that isn't the ugly box it came in, I recalled this handy contraption. Here's how you put one of these simple little things together:
1. Start with an empty container with a pour spout, a jar, and a ring. (Or find another place for your salt. The jar, perhaps?)
2. Trace around the ring or flat, and cut the top off. Stay as far away from the spout as you can. Trim your new spout top down to fit inside the ring.

3. Trace around the top onto your fabric or cardstock and cut it out. Also mark where the spout is, and cut that out, too.
This step is entirely optional, but it is a good way to match the decor to your kitchen, bathroom, laundry room, etc. (The yellow one is going in my bathroom, and the green flowers go in my kitchen.)
4. Put the whole thing together, and there you go! A jar with a pour spout that matches... whatever!