Tuesday, January 7, 2014

Look Who's Still Alive!

...that'd be, me.  What an absence!  I'm a terrible blogger but we knew that already.

So... where to begin.  TONS of things have changed since two Easters ago, which was my last post.  (YIKES!) But I won't bore you with the day-to-day.  Just the big stuff.  Ready?

We used to live here.

Now we live here.


As someone who NEVER thought I'd live in a trailer, this was a REALLY REALLY REALLY big deal to me.  I'm learning.  Trailers are okay.  I know, I wasn't convinced, either, but we actually like it here.  A lot.

This guy was little.


And now he's BIG!

And the other ones got bigger, too!

We're HOME SCHOOLERS!  
Another thing I never-in-my-wildest-dreams thought would happen.


Legos are the new textbooks.  Just ask a home-schooler. 

And perhaps the biggest little thing... 
we've gone Paleo.  

I used to cook from scratch with whole wheat flour and raw sugar, source out whole wheat pasta and buy all this loot in bulk.  Nowadays I still cook from scratch, but I use coconut flour and raw honey, source out quinoa, and buy eggs as if all the chickens around the world are about to retire.  And you know what?  I think we're better for it.  If you're not sold on Paleo, that's really okay with me.  But we seem to be healthier on it.  At least, my husband does--I need to find someone to stand in front of my (DARK!) chocolate stash and slap me every time I meander over.  I do cheat too much, in the area of cocoa-related fare, but what are New Years resolutions for, eh?!  :)  We'll see. 

Our new [20 acre] front yard.
That's not our dog.

So, the trailer thing.  We LOVED our last house.  It was 2200 sq ft of everything we wanted.  But it wasn't ours (neither is this one, btw) and we couldn't do "whatever we wanted", so when our friend who lived a few miles up the road moved to town and left her 1200 +/- sq ft "antique" trailer setting empty on 115 acres beside two chicken coops and a 40' x 40' shed full of whatever we need to turn the ground, fix the fence, and work with a few animals, I knew it would barely take the gentle coaxing to "just think about it" that I laid on Hubby.  Tiny house?  We've lived in that sort of square footage before--not with 3 kids, but we're nothing if not adventurous!  And we could have chickens?  And we could have other animals, too?  And... and... and...  Our roomy, comfy, anti-chicken residence didn't stand a chance.  And so we moved.  

Our new doggie, Searge (Sarge?). 
Great Pyranese/Kommondor.  Love this guy!

Downsizing should have been the biggest challenge--we dumped at least half of our possessions--but the purging was good for us (and for Goodwill!) and we ended up feeling a lot lighter in the end.  The worst part was putting on hold all the things that "needed" to get done.  And the hardest part, in the end, has been catching up.  I've said it 100 times before, and I've never meant it more than now:  the next house I move into will be our forever-home!  'Til then, I'm NOT moving again!  (Yeah, yeah, yeah...  we'll see.)

It might be helpful in understanding our move to know that Hubby and I care a lot about the welfare of the animals we eat, the environment, our health, and our budget.  These are all reasons we went Paleo, too.  When you embrace the Paleo lifestyle, you eat a lot of HEALTHY, HAPPY meat, eggs, and veggies.  We're enthusiastic DIYers, so acreage and the opportunity to use it can go a long way in providing access to environmentally-friendly, affordable grass-fed, free-ranging meat and eggs, which hits all the aforementioned moral hotspots.  Even before going Paleo, we didn't want to eat CAFO meat or factory-farmed eggs.  But soon, convincing myself that "cage-free" actually means something on an egg carton (it doesn't) and picking the pinkest hamburger out of a shrink-wrapped line-up at the grocery store won't be a reality for us.  Insert Happy Dance. 

Little Miss with our 45 chickens.

And then there's homeschooling.  Little Miss is 6 and a half.  Kindergarten didn't traumatize her, per se, but she didn't exactly thrive there.  And the rest of us pretty much hated it.  So we're trying something different, and generally loving it. 

All in all, we're just as busy as usual and that's why I'm a terrible blogger.  Sorry!  And... it's likely to continue that way.  But if this wasn't your first blog post, you knew that already.  :/ 
Thanks for reading, see you again next year!!  JK--hopefully... 

Friday, March 22, 2013

Eureka!

I found a great way to use leftover breakfast oatmeal, that doesn't involve the dog or the compost pile!  

 
Unfortunately, I have no measurements, and neither will you, as leftover amounts vary.  
So here's what I did:

I took our leftover oatmeal (probably about a cup) which had some chopped strawberries, brown sugar, and ground flax seed added in already, and right in the pan I added a healthy scoop of peanut butter, a splash of vanilla, and a few tablespoons of whole wheat flour (I use either white whole wheat or regular whole wheat, always unbleached, for everything but diaper rash treatment).  Stir in enough flour until it has the thickness of cookie dough.  I want to warn you that it will not look like the cookie dough that you're used to, because the oats are already cooked.  It will be stickier than oatmeal cookie dough, but the thickness should be about the same.  And then add whatever else you want--I added a handful of chocolate chips, and diced fruit or nuts or coconut would be great, too.  


Drop by spoonfuls (mine are usually heaping) onto a cookie sheet and bake for 12-15 minutes at 375F.  
 
Letting them cool on the cookie sheet for about 10 minutes will help them to set up.  They'll be wetter than the average oatmeal cookie, again because of the pre-cooked oats, but that didn't seem to make any difference to my 2, 4, and 5 year olds.  They loved it, and although I couldn't have any because of my unfortunate inability to digest dairy (there was milk in the oatmeal), that's enough for me to say that they're at least "good" if not "really good".  


And, nutritionally speaking, they're just as nutritious as the breakfast that you were feeding your kiddos, with the added protein and brain-developing fat of peanut butter and fiber of whole wheat flour.  
 
And I'm with the French on the topic of chocolate: good chocolate (not the milky and over-sugared kind--we use at least 70% cacao) should be enjoyed often.  So throw some in there!  It's such a mood booster.

Thursday, July 12, 2012

HEALTHY Cookies... I'm Not Even Kidding

When I discovered I had a problem with dairy, my friend bought a bag of some hoity-toity expensive chocolate chips from a health food store, because I. LOVE. CHOCOLATE.  Well, I didn't stick with the chocolate chips (I use Ghirardelli Semi-Sweet Chocolate Premium Baking Chips from Hy-Vee for about $3.79/bag), but the cookie recipe on the back was ahh-mazing!  I made it for a healthy pre-k snack on a regular basis, and one kid liked it so much that he asked his mom to start making them at home.  All the moms eventually got the recipe.  They are a huge hit for parents and children alike, without fail.  

I have already listed this recipe on here once, but here it is again: 

Vegan Chocolate Chip Nut Cookies

1/3c almond butter or peanut butter
2T canola oil
1c sugar
1/3 c milk substitute
1t vanilla extract

1c whole wheat flour
1/2 t baking soda 
1/2 t salt
1c rolled oats
1/2c chocolate chips
1/2c chopped macadamia or walnuts (optional)

1.  Preheat oved to 425F.
2.  Whisk together first 5 ingredients till very smooth.
3.  Combine flour, oats, soda, and salt, then add to wet mixture with chocolate chips and nuts.  Stir to combine. 
4. Drop batter by large spoonfuls onto prepared baking sheet (I use parchment paper).  Bake for 8 minutes, or just until they crack (or just a touch less).  
5.  Let cool on sheet for 10 minutes, then transfer to a wire rack to finish cooling.

In case you weren't already enjoying that slice of heaven, there it is!  And here are some modifications to make it suit anybody's tastes and dietary needs...

*If you're avoiding peanuts or tree nuts, try sunflower seed butter.  To make your own, leave sun flower seed kernels in a food processor longer than you think you should ever leave anything in a food processor, and it will eventually begin to look like peanut butter.  Add oil and/or honey, if you want. You don't have to. It's good. Or... just buy some. 

*If you're gluten-free, use oat flour instead of wheat flour (make sure they're certified gluten-free oats).  This might require you to throw in another small handful of oats.  No biggie.  Oatmeal is fantastic, nutritionally speaking.  Wait, what's that?  No oat flour?  Process a cup of regular oatmeal in the blender or food processor until it looks like flour.  Yes, that easy!

*If you want to give it extra texture and nutrients, throw in a big handful of shredded coconut.  Y-U-M.

*More dried fruit/nuts makes them even more nutritious.

*You can replace at least half (that's all I've tried so far--more might work) of the sugar with honey or agave nectar.  This also might require throwing in some extra oats or coconut flakes to thicken up the batter. 

*You can cut the sugar down to 3/4 c without noticing a difference.  I've been meaning to try brown sugar in its stead.  I bet that would add some nice flavor, and you could probably use even less.

*Of course, if you love and/or tolerate dairy, you can use dairy milk and butter instead of milk substitute and oil. 

*Coconut oil would be a good replacement for the canola, and applesauce is a great substitute as well. 

If you think about it, these can be breakfast (cutting the sugar down or replacing it helps).  And the healthier versions do often become breakfast at our house. It's also a fast and easy recipe to crank out, with a single bowl left to wash, if you're craving something sweet late at night.   Which is what happened last night at my house, and they were here for breakfast in the morning.  That's why I decided to share it with you today!  

Enjoy!

Wednesday, July 11, 2012

It occurs to me that I cook... a ton.  I quite literally spend most of my day, every day, in the kitchen.  And, after years of people asking me for recipes, many of which I came up with myself, I decided I should probably start sharing a few here.  I keep thinking, for some reason, that the purpose of this blog is sewing, but that's not really true, is it?  That just happens to be my favorite part, however much I don't actually get to it because I'm busy with lesser favorite parts... 

Today, it'll be my go-to pizza crust recipe.  Adapted from something on allrecipes.com, this is AWESOME for pizza, calzones, and I'm about to try it for this:  http://rhodesbread.com/blog/blog/braided-spaghetti-bread.
I am entirely certain that it will be fantastic for that, as well.  I use it at least once/wk, and anybody who's ever tried it has LOVED it!  It's the reason we don't get take-out or restaurant pizza anymore.

Pizza Crust

1T yeast (or 1 pkg)
1c warm water (warm, but not burning your finger)
1t sugar
2T oil
1t salt
3c flour*

Proof your yeast with the water and sugar (mix it with the sugar and water and let it foam to prove itself worthy of your time).  Add salt, flour, and oil.  Mix and knead (a stand mixer is a god-send for time-saving here) until it forms a ball.  Let rest 5-10 minutes.  Knead all bubbles out and form a 14" diameter circle (a large pizza).  Top.  If you want a thick, puffy crust, let it rise until it looks thick to you.  Otherwise, bake it in a 425F degree oven for 12-15 minutes. 

You can top this crust however you like, and it's awesome.  Top half of it generously, leaving about an inch around the edge, fold it over, and crimp it with your fingers for calzones (I keep these in the freezer for Hubby when he doesn't have leftovers to take to work).  Spread olive oil, herbs, and cheese over it for cheesy bread.  There are TONS of options here!

*For the flour, you have a variety of choices.  It really depends on how you like your crust.  For ultra-puffy and soft, go 3c all-purpose flour.  For very puffy and soft but healthier, try half white whole wheat flour and half AP.  For a little tougher but a lot healthier, try half regular whole wheat.  I have recently made it all white whole wheat, which got great reviews.  We are trying to make the switch to at least all white whole wheat flour--and I have to be honest here, it's only because I'm not entirely sure of the details of the white whole wheat vs. regular whole wheat.  More on that later, I'm sure, as I navigate these finicky-term-infested waters!

Let me know how it goes, if you whip this one out.  Especially if you find a new dress-up for it.  :)

Another Awesome Blog! And a Recipe!

So, once in a while I'll mention a website or blog that I have fallen for, and I feel the need to give a shout-out to this one.  I can't remember how I found it--probably looking for a whole wheat bread recipe--but I have gone back to it day after day for recipes and information.  It's great!  We have been "naturalizing" our house for quite some time, and continue to work toward eating food and using products that are free of artificially-created ingredients, and this is an excellent site for that. 
Okay, okay, already!  Here it is:


And no, you don't have to be a Christian to glean tons of awesome information from it.  

And while I'm chatting about whole wheat bread, I'll give you my whole wheat waffle recipe!  It is newly discovered (one of the thousands of recipe sites--can't remember which one--and no doubt tweaked in my own kitchen) and Hubby even likes it, which is a big step.  I use white whole wheat flour, but the original recipe called for regular whole wheat flour.  To make it dairy-free, just use milk substitute (almond, soy, rice) and vegetable oil.  It's great!

[White] Whole Wheat Waffles

1 1/2 c (white) whole wheat flour
2t baking powder
1/2 t salt
2T sugar
1 large egg
1 1/2 lukewarm milk (mine's usually cold--that's fine)
1/3 c melted butter or vegetable oil

Mix all the ingredients together well, and cook on a prepared waffle iron. Enjoy!


Tuesday, June 26, 2012

Daily Grind

I was going to lead with an apology for abandoning the old 'blog again, but it seems like that's been done before, no?  Let's change things up a bit.  
You know I'm busy.  

Things I've been up to lately include but are by NO means limited to...

This.

This.

This.

 But mainly this...

...and this.  

That would be... 
an Easter dress for a 3 year old based off of a picture of a dress from a boutique that my good friend wanted for her girl but could not obtain; a skirt I whipped up for myself and LOVE; a hefty stack of cloth napkins that I made out of samples of fabric that were discontinued at a furniture store, given to me by a friend who used to work there (completely free, awesome cloth napkins!!); my 3 year old and almost-5 year old; and my 1 year old and my 29 year old--err, my handsome husband and the capable provider for our family.  (LOVE that guy!)

Just didn't want to leave you hanging... even longer.  More later. 
(How much later??  Shall we begin to place bets??)

Oh, while I'm here, I'll impart a small nugget.  I have begun to indulge in a little afternoon treat that I want to chat about for a second.  In the morning, I make an extra cup of coffee--just one more than what I normally drink.  I doctor it up with a small shot of chocolate syrup, pop it into the fridge, and in the afternoon I mix some almond milk in it and have it over ice--TA DAA!  Iced coffee, with next to NO effort!  I leave it in the pot, adding the syrup after I've drank all I'm going to drink for the morning (but before it goes into the fridge so that the sugar dissolves completely), so I don't have any extra dishes.  If you're lucky enough to tolerate dairy, you could add cream or regular milk, and some sugar makes it a little more "treat-y".  
Okay, so it's not an original idea, but it is a small way that makes my afternoon a little happier, and helps to ward off the cravings that so easily turn into chocolate chip binges.  The reason I thought of it right now:  I'm having one, with a bit of vodka (I know, I know--whiskey would make it a proper Irish coffee, but I didn't have any) as a nightcap after a long day. Don't worry.  It's decaf.
And.  It's.  Awesome.  
Cheers!!

Thursday, November 10, 2011

It's the Most Wonderful Time of the Year

One year ago, I went through the most stressful time of my life. My husband's job was working him about 100 hrs/wk on night shift, I was 9 months pregnant, and the older two were 3 years old and 22 months old. Oliver was born on a Monday around lunch time, and my dear sister Brenda died early the next morning. I hosted Thanksgiving dinner two days later in a house much to small to fit everybody, and the day after that made a 4 hour round trip (more like 6 hr, said and done) with the two tiny kids and a very fussy 4 day old for the funeral. The next week, my husband started his new job 3 hrs away, only to come home on weekends. I parented 3 under 4 alone from December until March, when we finally joined him. Things got a lot better from there, due largely to the fact that dh is so much happier here, in a job and a location that he likes. Now, if only our house in Iowa would sell!

This is not the first holiday season that we will spend without Brenda, but it is the first time her name will not appear on my master list for gifts and cards. Likely due to the shock of the fresh event last year, I'm much sadder this time around. Brenda's childlike mind made for some lively discussions and happenings at meals and get-togethers. Now, there is no one to take your drinking glass to the sink to be washed before you're finished with it. No one to watch out the window, nails between teeth, worrying over who's late to the present-opening. No one will pull out his or her notebook and start their Christmas list for the next year just as soon as the last gift is opened. And for the life of me, I MUST find one of her hand-tracings with her ring sizes written on each finger!

Brenda, Easter 2009

There has been time to process some changes before the 2011 Christmas checklist was written up. Now more than ever, for some sad reason, I'm flooded with gift ideas for her. Here's one huge thing I learned from her passing: DON'T WAIT! If there's a small thing that you think would brighten someone's day, don't wait for a reason to execute it. If you feel like you should send a quick card for no reason to someone, do it! As often as it seems birthdays, anniversaries, and holidays come around, there's really no telling if they'll actually get here, is there? Nothing drives that home like an unexpected loss.

So this year, as Thanksgiving approaches and I am inundated with the seasonal tasks of menu planning, gift making and buying, and calendar keeping, my very honest thoughts on thankfulness are as follows: Take my money. Take all that is in my closet and hanging on my walls. Take our cars and our house (yes, PLEASE take our house!). Take our fancy dinner and the table we serve it on. Just let me enjoy my family--my loving husband, my precious children, my generous parents and in-laws, my siblings, my precocious nephews, and those friends who are close enough to count as family--for another year, and may I be so blessed to have even more.

Happy Holidays, from my family to yours!

Thursday, August 4, 2011

It's Not "Free Time"...

...it's insomnia. That's how I'm able to get things done these days. At least, that's how I'm able to blog about it! So, here are some things I've been up to over the last week or two.

I kept a pair of worn-out pj shorts that I LOVED and turned them into a pattern piece. To do this, cut them in half at the seam that runs down the front and up the back (where the good Lord split ya!). Since shorts are symmetrical, you only need to double layer the fabric, right OR wrong sides facing, cut out two mirror-image pieces of the same pattern piece, stitch them up the middle (right sides facing), sew the inseams together, and install a waist band. If you use the fabric's selvage as the bottom of the legs, you don't even have to finish the edges! A great use for stray pillowcases or worn-out sheets with a few good areas left. I have 2 pair and plan for many more.

I am just plain tickled with how this top turned out! A while back, I made standard front and back pattern pieces based off a dress that fit well, so there's no guessing at the right size when it comes to making a new top. I just use the pieces and alter them as desired. This fabric isn't stretchy, so to accommodate my need for easy breast exposure (ahem, I breastfeed, please remember!), I made the front about 5 inches wider in the middle and ran elastic thru the neckline. And because I think raw bra straps are tacky, I gave it wide straps that taper at the ends. And a pretty blue ribbon to match the tiny floral print, so that I don't look quite so pregnant (I'm not, btw). I LOVE it!

I have trouble getting this pattern to fit right, but with enough altering, this dress finally did. And tiny sleeves, because arm fat needs a camouflage and I intend to wear this to church. Gifted fabric--free clothes! The undershirt underneath was $3 at Kohl's, but was also the pattern piece (by folding it in half) for the next two photos...

As per the aforementioned public nudity (I'm being facetious--I assure you, I'm quite discreet) I was in dire need of undershirts with stretchy necklines. So I worked up a couple. The lacey scribbles are deliberately shabby-chic, and mainly for sleeping.

I wear this one in public. The fabric is a little thicker than I'd like, but it's a good lumpy-belly-hider because it's not too tight.

I got an email from Etsy about herbs. The kind that are everywhere, so you don't realize what they are. I'm still looking for mugwort and a few other things, but I was very familiar with the first of the herbs they featured: plantain. Not the banana's cousin. I never even noticed it was anything other than grass because it's such a ubiquitous plant but there it was, everywhere I looked, when I looked for it! The short story: the juice in plantain is supposed to take the infection and pain out of bee stings, bug bites, cuts and scrapes. By now you're familiar with my feelings on free and natural stuff, so I've been cleaning out those little plastic shampoo bottles that jump into your luggage at hotels and making little bottles of plantain tincture. If it works, then I'll have nearly-free, natural "medicine" and facial astringent in a couple of weeks. If not, I'm out a few ounces of apple cider vinegar and I've de-cluttered a shelf in the bathroom closet. I think it will work, because when dh, f-i-l and I picked blackberries last weekend I got scratched up and stung, and it seemed to calm my irritated hands. But that could have been all in my head, so we'll see, when the tincture matures. You can follow one girl's adventures in plantain tincturing here. (Search "plantain". I couldn't get the direct hyperlink to work.) She's pretty enjoyable. I think you'll like her.

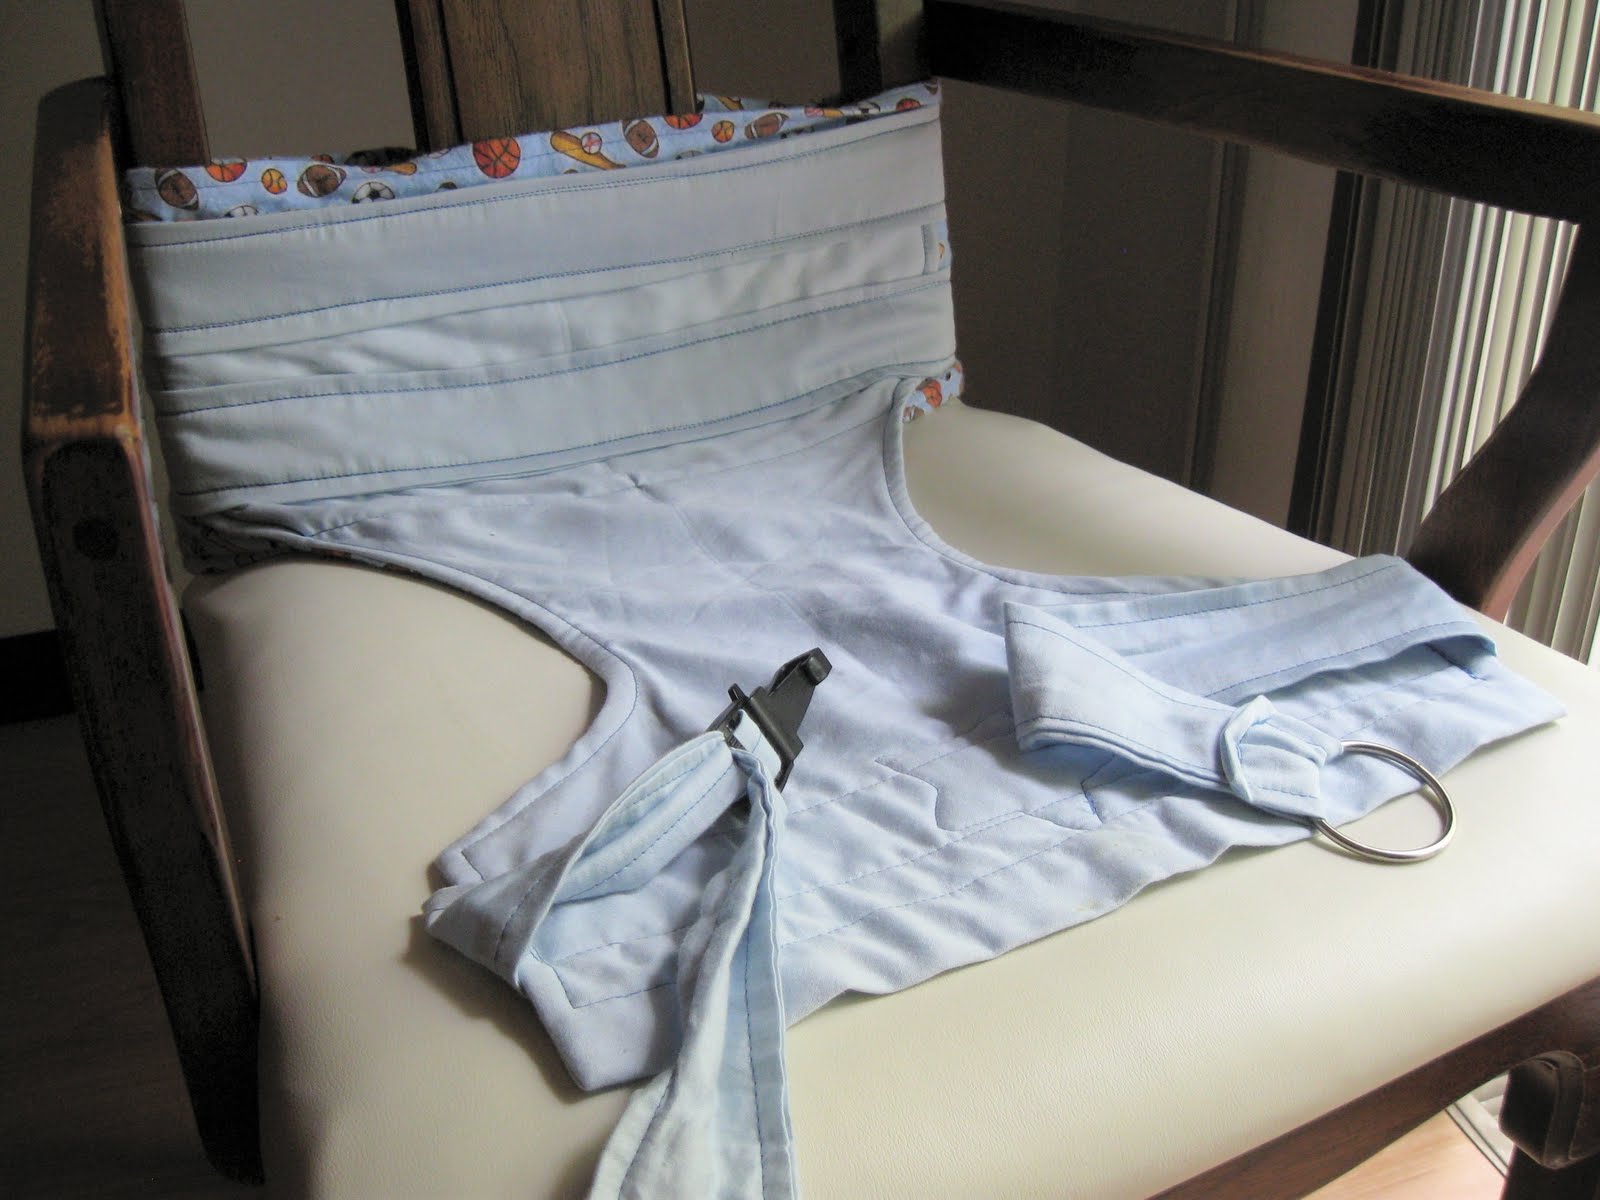
This last thing is just a plain good idea. Not mine, but good nonetheless! It's like a seat belt, for a regular chair. I saw this done on a blog that belongs to a mom who is by far smarter and more talented than I, and I wish wish wish I could reference it but I have no idea who/where she is. So, if anybody knows, please leave a comment below!

Because I couldn't find it, I had to come up with a design on my own. Little Miss happily modeled it for me here. It's like if you were to strap a diaper to a chair, and strap the kid in the diaper. It rolls up neatly and can be tied with the straps. I was going to put some sort of pocket on it to fold it into, but really, who has the time??

Back view. I used D rings to secure it. (Don't buy those new--harvest them off of 25 cents thrift store belts!)

For the front strap, which goes around the child and the chair, I used an O ring and a plastic clip that, I think, came off of a pair of snow pants. I would have used those plastic clips that are on stroller straps, but I didn't have any on hand.

Here's my sketch, if that helps any.

And here's one of the three most important things I've been working on. See those 4 teeth?!?! They're SHARP! And I don't recall the other two biting quite so hard...

And now I'm off to potty train my two year old. I'm ready for only one kid to be able to cover me in poop. Wish me luck!

Saturday, June 11, 2011

Tutorial: One Double (Full) Fitted Bed Sheet to Two Toddler Fitted Sheets

When we moved, Grandma J gave us two toddler beds and the double bed that Little Miss used to sleep in became the bed in the guest room once again. We found ourselves in need of more crib-sized fitted sheets, and with a surplus of girly double sheets. In case you were wondering, as you can see in the pictures below, a double sheet is almost exactly the size of two toddler bed sheets. So, naturally, Mommy got an idea.

See how, when folded in half, a double sheet hangs off a crib mattress? This is a perfect size, when the corners are fitted, for a crib mattress sheet.

Also, notice the toddler in the picture. It is important to note the virtual impossibility of snapping a photo of a mattress on the floor in the presence of a toddler without said child bouncing on the bed.

Another view, another child.
Okay, here we go...

1. Fold your sheet in half. Cut along the fold line.

2. Finish the edge. Doesn't matter how. Serging it is fastest. I did that on one of the "new" sheets for sake of time and ease. On the other (in the pic), I folded the edge under and sewed a straight stitch to match the finished edge that was already on the sheet.

3. Looking at the corner of the sheet, you can easily see with a striped pattern that they meet at a 90 degree angle. This means that you can simply cut out a square and join the sides to make a new corner. This can be done by folding in one corner to make a triangle and cutting along the edges.

To find the size of the square I needed, I needed to know the length and location of the side of the corner that was already in the sheet. This was easy to find because of the stripes. I measured the seam of the existing corner to find the length, and followed the stripe across the sheet to find where the edge of my square needed to be placed on the long side of the sheet.

4. Place pins to mark where your edge should be. Fold in the corner to make a triangle, and pin in place to avoid fabric shifting as you cut. Cut two sides, using your triangle as a guide.

5. For the other corner, you can repeat step 4 or use the square that you just cut out as a guide. Just lay down the square that you just cut out, and cut around it.

6. Match your new raw edges, right sides of the sheet fabric facing.

another pic of the edges matched up

7. Sew the raw edges together. Finish edge (zig-zag, serge, or fold over and hem).

8. To figure out how much elastic you need to fit your corner, simply measure the elasticized length of the sheet. Do NOT stretch it out for this part. (There are no red squiggly underlines showing up, so I'm assuming that "elasticized" is, indeed, a real word.)

Obtain 2 lengths of elastic for this.
Because I used re-purposed elastic--and, come to think of it, a gifted sheet--this was a completely free project for me!

9. Find the middle of the elastic.

Mark it and match it up with the corner seam on the sheet.

10. Holding onto the middle of the elastic (which is pinned to the sheet), pull the first half of your elastic as tight as it will go and find the point of the fabric it reaches to. Start sewing it from there. I think I used a multiple zig-zag stitch, set on the longest length and widest width. When you get to the middle of your elastic, take your pin out and keep sewing, pulling your elastic as tight as it'll stretch.

11. And... you're done! If you're lucky your toddlers will be over the moon at the awesome sheets that Mommy just made. If you're really lucky, they'll give you a real boost by running to Daddy to gush about what a great job Mommy just did.
This day, I was lucky. :)