I have finally been feeling up to doing... well, anything. But the things I've been up to are pretty boring; nothing to talk about, really, just mending and cleaning. However, if I'd taken before and after pictures of my sewing room, you would probably share my sentiment that I might as well have climbed Everest at record speed--WOW that place was awful! I've been mega-brainstorming top recons lately, as I will be needing a mini wardrobe revamp with the oncoming warm weather, and I ran across Tea Rose Home which is an amazing little blog by a very talented lady who makes gorgeous frilly items. It's worth checking out. I spent quite a while there this morning. Great stuff. I'll definitely be referring back to it as I continue to rifle thru my closet. I also added it to my blog list.
HOPEFULLY I will soon have some fun things to show you. It's supposed to be rainy today, so perhaps I'll be able to sit down with a project that doesn't include patching holes or sewing on buttons. Ta for now!
Friday, April 30, 2010
Saturday, April 24, 2010
Pink and Green Felt Flower Brooch
This year, I have been responsible for the flair that goes into the MOPS Thank-You baskets for our guest speakers. I realized at 9pm on Thursday night, after an exhausting day, that I forgot to make it for Friday's meeting! Luckily, a few days earlier I decided to invest a whopping $5 in a glue gun (I know--I cannot believe I didn't have one of these!!) so it didn't take hours to put together as it would have if I'd have sewn it all, like usual. It took one hour, start to finish, all done while I was watching the Marriage Ref, which is one of the funniest shows that I've seen on tv in quite some time. Anyway, I know the internet is swimming with flower pin tutorials, but here's one more, because I remembered to take pictures!!
 I wanted a layered look, and the only felt colors I had that I liked together were this pink and green. I started by cutting out 10 pink petals. Nothing special. Just 5 little football shapes (well, a little pointier than a football, but you get it), and 5 little petals that are the same as the first 5 but with one straight end.
 I then stitched the football-shaped petals together. I arranged them with overlapping ends and stuck a few stitches through it, making sure I caught all the petals. This is my bottom pink flower.
 To make the top pink flower, which is the top layer of the brooch and needs more dimension than the other layers, I folded the petal in half length-wise and ran a stitch through the straight end. TIP: I thought I was going to work in the color yellow at some point. If I made this one over again, I'd use matching thread.
  String all the remaining petals together in the same way, and secure the thread ends together.
 How pretty!
 Then I trimmed down the second pink flower to the desired size. This is why it's a good idea to cut your petals just a little bigger than you think you'll need.
 For the green parts, I cut out 5 tiny football-shaped petals and a circle that was bigger than the flower. Now, on to the star-shaped green back flower. Most people can draw a 5 point star, right? I marked the points with pins, and cut out little arches between the pins. Using pins saved me from the hassle of having to draw out a star shape on it. If you're not confident in your star-eyeballing, just use a piece of chalk or a marking pen to draw the shape.
  See the star shape?
 Trim up the points. These are your green flower parts.
 To attach these tiny green petals, I arranged them so that they were poking out of the pink petals of the top flower, and then glued them onto the back of the pink flower.
 From there, it wasn't hard at all to glue everything together. Just apply the glue and stick your layers together. Then pick out a pretty button...
 ...and glue that on, too.
 For the back of the brooch, I stitched a pin back to another green circle of felt. I then glued that onto the back of the flower. This makes it much easier to make clean-looking stitches.
 And there you have it!
 Another cool part? The pink felt was the exact same color as the recipient's jacket. Just her style!
TOTAL COST: Scraps and 2 mini hot glue sticks.
Fun in the Yard
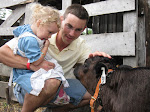
Thursday was the last brilliant day before a string of rainy ones, so we got the kids out for some fresh air before the drizzly weekend. Hubby worked on putting in 4 more raised beds (we had 2) in the garden, and Little Miss and Bubby ran around playing with the dandelions. Well, Rhyl played with them. Gus mainly chewed on them. What fun!


Friday, April 16, 2010
T-shirt Recon: Ruffly Gathered Pillow
Today, I saw the inside of my sewing room for the first time in weeks. Feeling nauseous will somehow sap every ounce of energy right out of a body, and I just haven't had the gumption for much of anything. In fact, if you see my husband, thank him for feeding our family lately because I've barely even been cooking--let alone sewing! But the projects are piling up, and I so hate telling someone I can do something, and then NOT doing it. So, this morning I chose to work on Connie's pillow. Connie J6 is my internet buddy who sends me fun stuff like fabric and notions, and I make things for her in return.
Today, it was this...
I cut a rectangle out of the front of the shirt. I used all the logo that I could, but the collar got in the way of the top arrow.
 Then I cut out the largest rectangle that I could from the back of the shirt:
 I laid the logo rectangle onto what might have been a body pillow case at one time--this fabric remnant was free in a batch of stuff that was given to me. You'll need 2 of these. This is the size of your pillow. Since t-shirt fabric is stretchy, you'll want a non-stretchy material so that your pillow will keep its form.
 Pin and baste stitch the logo rectangle to one of the white squares. You could use any kind of fusing to put it together, but I didn't have any of that on hand and it costs money, which I hate to spend! So I sewed it together:
  Run gathering stitches evenly across the large rectangle. Gather it up and pin it to fit the second white rectangle:
  Baste stitch the edges in place:
I ran 3 lines of stitches down this piece once the gathers were all smoothed out. This will keep it in place when you add the ruffles. If you didn't make evenly spaced gathering stitches, don't worry! It doesn't really matter. Here's where you sew a straight line anywhere you want a ruffle, and remove those gathering stitches if you need to (if you're covering them with a ruffle, why bother?). Cut ruffle strips, one to two inches wide, out of the sleeve of the shirt:
 Cut ruffle strips, one to two inches wide, out of the sleeve of the shirt:
Sew a gathering stitch down the middle of all three: Gather them up to fit your pillow. Pin in place, then sew in place. It doesn't have to be perfect, since it's such a scrunchy look.
A tip I found handy: It'll look nicer to take your gathering stitches out of your ruffle strips. To make this easier, try putting the gathering stitch just a smidgen to one side of the center of the strip. That way, you can sew down the middle of the strip when you attach it to the pillow without sewing over the gathering stitch, which will make that stitch harder to remove.
I'm very happy with how this turned out! I sure hope ConnieJ6 is, too.
 Gather them up to fit your pillow. Pin in place, then sew in place. It doesn't have to be perfect, since it's such a scrunchy look.
A tip I found handy: It'll look nicer to take your gathering stitches out of your ruffle strips. To make this easier, try putting the gathering stitch just a smidgen to one side of the center of the strip. That way, you can sew down the middle of the strip when you attach it to the pillow without sewing over the gathering stitch, which will make that stitch harder to remove.

Pin the rectangles together, right sides facing, making sure all pink edges are outside of the hem:

Sew three sides of the pillow, leaving 4 or 5 inches on one side open for turning. Make sure you're sewing inside all the previous construction stitches:

Clip corners and trim edges: Turn outside-in and stuff with polyfill, or your pillow stuffing of choice. You could even use fabric scraps, if you save them (as I do, but since this project is for someone else I went the more professional route and used polyfill):
 I was very tempted to use my sewing machine to close the opening, but I knew that hand-stitching it would look a lot better. So, again, because this is for someone else, I took the time and did a better job (that's how I approach all my sewing, in case you were wondering!):
 Make sure you carefully stuff it so that it's not lumpy and floppy.
 Turn outside-in and stuff with polyfill, or your pillow stuffing of choice. You could even use fabric scraps, if you save them (as I do, but since this project is for someone else I went the more professional route and used polyfill):
 I was very tempted to use my sewing machine to close the opening, but I knew that hand-stitching it would look a lot better. So, again, because this is for someone else, I took the time and did a better job (that's how I approach all my sewing, in case you were wondering!):
 Make sure you carefully stuff it so that it's not lumpy and floppy.
I'm very happy with how this turned out! I sure hope ConnieJ6 is, too.
TOTAL COST: one old T-shirt and some fabric scraps. So, in most cases, FREE!
Adventures in Wine Making
Only time will tell if I should have titled this post, "Misadventures in Wine Making". I think it was oneprettything.com that featured this craftster.org post about dandelion wine making. Messing up all over the place, I have undertaken this endeavor and documented it along the way.
Here we go...
To kick off this great experiment, we needed 2 liters of dandelion blossoms. About an hour and a half in the yard and I had probably twice as much as I needed, but had spent some good time outside in the glorious sunshine with the kiddos, which was good for all of us. After a long winter it's getting warm here in Iowa, and we've been cooped up inside for too long. Our time in the elements resulted in two pretty tired kids. Gus at lunch:

And Rhyl didn't make it off the couch after a PB&J:

As the first of many mistakes that my batch of wine may or may not survive, I had many things that needed my attention, and by the time I got back to my bucket 'o' dandies, they were wilted:

Let's hope that doesn't ruin things too badly.
Then I rinsed them:

And then, after I'd put them in the pot with the water, I stumbled upon a little more Dandewine wisdom that grieved me. NO GREEN??? You've GOT to be kidding me! Some directions say no green parts at all. Some say leave a little green, but absolutely NO stems. None are more lenient than that. This is the type of tedious, headache-inducing stipulation that, had I known before I started, would have kept me from doing this. BUT, I'd already spent an hour and a half picking dandelions and corralling the kids outside. I wasn't going to waste that. So I got to cutting:

And I got about a quart of blossoms cut off the base of the flower before I decided I was done. My 2 liters of flowers are mostly blossoms with the tiny green leaves that you'd need magic elfin fingers to pick off.

Into the pot with water and juices, onto the stove to boil, into a dark corner to steep for 24-48 hours. Except, I forgot to add the yeast before the steeping began, so after 48 hours, I added the yeast and waited 24 more. I'm really hoping that the recipe I found that read, "Absolutely NOT more than 48 hours" was written by a very finicky person with a very particular way of doing things.
After roughly 60 hours of steeping, the sugar, spices, and orange peel stirred in, I strained it out:

And jugged it:
I'm curious to see how long it's going to bubble. After 18 hours, it doesn't show any signs of slowing down. It smells great, looks delish... Only time will tell.

More later on this! But, it'll be a LOT later. It's got to sit for a few months. In the meantime, keep your fingers crossed! Because if it doesn't work out, that was a LOT of wasted time! And I hate that. Clearly, since I've been useless for a few weeks. :P
Saturday, April 10, 2010
Family Values
Not sure if I've mentioned this, but I'm a farm girl. I spent years 2 thru 18 in the rolling hills of NE Missouri, cleaning out barns and carrying feed buckets. Okay, so that's not ALL I ever did but I like to think I helped out a good amount, and not just when I was working off a speeding ticket fine paid by my dad. So anyway, my point is, now that I have my own kids, I've got city-livin' out of my system, and the kids are nearing the age of participation, we're doing more and more outside in the way of agriculture. It's been mainly gardening so far but that has recently been extended to small-time chicken farming!

We got 12 frying birds and Hubby built a chicken tractor for them--a cage without a bottom that can be easily dragged to a new patch of grass. Six weeks is about all these birds need and they're ready to eat. Today, with Tapps in the back of my mind and hatchet in hand, we made our way to the killing post up in our shed. Our older 6 chickens met their fate with the help of some friends' boys, who were all too happy to play grim reaper for the afternoon.

Nick attached two milk jugs, which had the bottom and top cut out, to a post in the shed. The chickens were bound, inserted upside down into the jugs and beheaded. There, they flopped and kicked until their nerves were shot and then were carried to the front yard, like real rednecks, where we dipped them in boiling water and plucked their feathers out. Nick then took them in the house and cut them up. Six chickens got us one 5 qt stock pot full of meat pieces. Yum. Yum.

So, why title this post "Family Values"? Butchering chickens is one of my earliest memories.
From a very young age I was alongside the rest of the family, working on our food and learning about the cycle of life. It seems like overstating a simple chore but that is exactly what it was: building family strength and values.

Sure, it's gross, but talk about character building! These are the things I want to pass on to our children. Self sufficiency, a knowledge of the circle of life, the outcome of hard work (grumbling abounded once it was clear just how grueling the tiny feathers could be to remove), and the importance of treating everyone and everything--even frying chickens--with care and gentleness.
 After all, head chopping doesn't have to be terrible.
 I bet you didn't know that, did you?
Subscribe to:
Posts (Atom)